Friday, June 26, 2015

Enjoy one day free browsing on MTN with this Opera tweak

Telecommunications company MTN seems to
have partnered with popular news website Naij.com
and popular browser Opera Mini.
They are offering 24hour free internet access on
opera browser.


With your MTN sim and opera mini browser, you
can browse for free with N0.00 . You don’t need to
tweak
anything at all.


MTN 3GB HOTTER .CLICK HERE

How To Enjoy This Offer From MTN?

Make sure you have the latest version of operamini.
If you don’t, Download from playstore.

Visit http://webpass.opera.com

Use mtn default settings…

I guess this is only for Operamini.

But to use this on other apps and on PC Download

simpleserver from play store and change only this below.

Injection querry/url:  http://
server4.operamini.com

Injection Host: server4.operamini.com

For mobile Download
Autoproxy + Simpleserver
to power all other apps

Remember to create a new APN settings on your
phone as follows.

Proxy: 127.0.0.1

Port: 8080

APN: web.gprs.mtnnigeria.net

Save And Activate it as your default settings
Enjoy!!

Thursday, June 25, 2015

Does your phone Lag alot? Three quick ways to instantly speed up your Android phone without app

Everyone’s looking for easy ways to speed up their
phone, especially methods that don’t involve rooting or,
well, buying a new one. Here’s three quick tips that can
give you instant performance benefits.

Change your launcher

Most Android phones come with the manufacturer’s
custom skin which contains additional software and
functions over that which you would get from the
‘vanilla’ build of Android.
While these skins often add useful features they can also
be quite large and demanding on the phone’s resources
and cause it to be slowdown in the process.
Changing to a third party launcher can bring about
noticeable improvements in speed, especially one of the
more stripped back launchers like Nova or Apex.

These are faster and free from lag, but note that in
some cases the stock launcher will continue to be loaded
into memory as well.


MTN 3GB HOTTER .CLICK HERE

Change multitasking settings

Delving into Android’s developer settings can bring
about a few improvements to performance.
Go to Settings > Developer options and first
of all turn them on to make all the options accessible.
Now scroll down to the Apps section and select
Limit background processes .

This sets the
amount of processes that can continue to run in the
background.

By default the Standard Limit is what the
manufacturer chooses as the best option, but you can
also restrict the number, giving greater priority to the
app running in the foreground. Experiment with the
setting to find what works best for you.

Shorten animations

Also in the Developer options is the ability to
change the animation settings for your device.
This has
no actual benefit to the speed of your device but can
make it seem faster.

The Window animation scale, Transition
animation scale and Animator duration scale
all control the duration of the animations that appear as
you open windows and switch between screens.
The
longer the duration the smoother they appear, but if
you set them to be shorter (or even off altogether) the
device feels much snappier.

Set the Window animation to 5x then tap the
Transition animation button to see its immediate
effect. We recommend .5x for all.

you got any problem? comment Here

OPENVPN : MTN Unlimited Browsing with Zero Naira via OpenVpn on Android.


.


MTN 3GB HOTTER .CLICK HERE

I have this sensational feeling that our IMEI
Tweaking days are over and it’s time to get back all
our money stolen from us during the MTN BIS
ON PC and ANDROID days.

this tweak works flawlessly on the most
anticipated and ever lovely OpenVpn.

HOW DO I BROWSE FREE WITH
OPENVPN?

Download and install Open VPN on your
Android from Either playstore or this blog.

Import this SEXY configuration file to OpenVpn :
Download it HERE

Connect and start blazing, remember, this trick is

STRICTLY  UNLIMITED.

if it does not work comment here

Wednesday, June 24, 2015

Android hacking problems solved: How to fix a bricked phone and more

There are many benefits to be gained from hacking and
modding your phone. But it can be a daunting process
with a steep learning curve. Many users will find
themselves following instructions without really
understanding what is happening.
To help you understand a bit more about the issues
involved we’ve taken a look at some of the frequently
asked questions users have about rooting.


MTN 3GB HOTTER .CLICK HERE


Will I still get OTA updates
on a rooted phone?
The answer to this depends on who manufactured your
phone. Generally speaking, if you are rooted but still
running the original, unmoved ROM then your device
should still check and alert you to the availability of
over the air updates. Installing them will very likely
unroot your phone in the process so you will need to
reroot afterwards.

If you have modded your ROM, including relatively
simple things like removing pre-installed apps, then the
OTA update will probably fail. Reversing the mods
should make it work again.

If you’re running the Xposed Framework you will
need to uninstall this from within the app for an OTA
update to work. If you’re running a custom ROM you
will have to install updates from the ROM developer.

Can I install KitKat or
Android L on my phone?

If your phone is no longer getting official updates from
the manufacturer then you can in theory update it to the
latest version of the Android OS using custom
ROMs. Older devices, or those with low-end specs,

may not run so well, but most devices can be updated
with varying degrees of success.
There can be compatibility issues especially with older
devices, since developers will need drivers for the
hardware components of the phone, and if they don’t
exists for that combination of component and OS then
the developer will have problems implementing certain
features, such as camera support.

In some cases devices use processors that are no longer
supported, so cannot be properly updated to newer
versions of the OS.

Unless you are able to build the ROM yourself you
are reliant on your device having developers who are
making the ROMs for you to install. Most mainstream
phones will have a few devs working with them, and
will be working on ROMs; the cheapest or most
obscure handsets may not.

To find ROMs for your phone head over
to forum.xda-developers.com and search for your
device.

Can a custom ROM stop my
apps from working?

Apps that make use of DRM, or require a high level
of security, such as banking and finance apps, will often
not work on devices that have been rooted.
There are some solutions that enable you to hide the
fact that your phone is rooted, but these are by no
means fool proof.

Don’t forget that if you need to you can unroot your
phone even while running a custom ROM.

I’ve bricked my phone—how
can I fix it?

If you flash a lot of ROMs or mods then it is
inevitable that you will brick your device at some point.

A soft brick is generally not a problem. This means
your phone turns on when you press the power button,
but won’t boot. A hard brick, where the phone shows
no sign of life when you press the power button, is much
rarer and may not be salvageable.

If your phone won’t boot after flashing a ROM the
first thing to do is wait. The first boot after flashing
can take in excess of ten minutes.

Next, take out the battery or reset the phone by holding
the power button in for ten seconds.

Restart the phone
and boot into recovery mode .
Work your way through the menus to either reflash the
ROM; wipe your data (not doing this is a very
common cause of a non-booting ROM) then reflash; or
restore the Nandroid backup that you should have made
before you attempted to flash the ROM first time
around.

On many devices you can also use fastboot mode to
recover from problems, including reinstalling your
custom recovery if that has been wiped.

Why do I need a custom
recovery?

Recovery is a small piece of software that runs on a
separate partition to the Android OS.
Booting into
this partition enables you to access all parts of your
phone, including the files in the OS.

Recovery is used to back up or update the Android
OS and its data.

Every device comes with a recovery. The stock
recovery is not a consumer feature so has very limited
functions. A custom recovery, which is an essential part
of the rooting process, can do a lot more, including
flashing a ROM, creating a full backup, and mounting
the internal storage or SD card as a drive.
The two main custom recoveries are ClockworkMod
and TWRP. They have different interfaces but
largely similar feature sets; it doesn’t really matter
which you choose. see ( http://www.gistpluz.com/2015/06/how-to-flash-custom-recovery-like-cwm.html)

Do I need to clear the
Dalvik cache and data when
flashing a ROM?

The dalvik cache is a cache of optimisations that makes
your apps run faster (and will be phased out in Android
L in favour or ART). You should always clear this
when flashing a ROM.

The data and cache contains all of your data, including
your files, game save, text messages and so on. You
need to back this up before you flash a ROM as there’s
always a chance it will be lost if something goes wrong.

Ideally you would always wipe your data before you
flash a ROM. If you’re updating to new version of
your current ROM then you probably don’t need to,
but if you’re moving to a whole new build then you will
definitely need to.

If you don’t wipe and your phone won’t boot after
flashing, wiping your data and reflashing is the first
solution you should explore.

Will rooting or flashing a
custom ROM break my
phone?
The main thing when hacking your device is to follow
the instructions closely.
Make sure the ROM or mod is designed for your
specific device before you flash it (and note that some
devices have country-specific and international models,
so make sure you’ve got the right one there, too).
Also make sure that your phone is either fully charged
or, preferably, plugged into a power supply before you
start flashing anything.
Rooting and flashing ROMs will likely void your
warranty. In most cases you will be able to revert the
process before making a warranty claim—Samsung
devices being the notable exception to this.

See  http://www.gistpluz.com/2015/06/tutorial-on-how-to-root-all-tecno.html

also (  http://www.gistpluz.com/2015/06/how-to-root-your-android-phone-or_15.html

lastly  (  http://www.gistpluz.com/2015/06/how-to-root-your-android-phone-or

Step by Step guide to set up and use the Xposed Framework

The mods range from simple device-specific things like
improving camera performance on a single device or
customising a specific launcher , to major utilities that
enable you to fully power-up your device. These are
available through Modules —small apps that are installed
through the Framework app.
The Xposed Framework works on most Android
devices, but requires them to be rooted first. Let’s take
a look at how to get set up with and start using
Xposed.

Download and install Xposed
Framework

Ensure your device is rooted before you begin, then
download the Xposed Framework APK. There’s an
official thread about Xposed on xda-developers.com
where you can find information on updates, as well as
help and support. If you want, you can also download
and view the Xposed Installer source .

Install the Xposed APK—you’ll need to have
Unknown Sources ticked first.

Launch the Xposed Installer app. To activate it
tap Framework followed by Install/Update .

Grant Superuser permissions when prompted then
tap OK and your device will reboot.

Installing Xposed modules

When your device has restarted launch Xposed
again.To find modules tap the Download button.

The Download screen is split into three sections.

Framework shows the details for the Xposed
Installer app, and you will be able to download updates
from here.

Installed shows the modules you currently have, and
again you will download updates to them from here.

Not Installed shows all other Xposed modules.
Scroll through the list, or perform a search if you
know what you’re looking for (you can also search for a
specific device or manufacturer name).
When you find a
module you like the look of tap it to find out more
information, as well as compatibility.
To install a module swipe to the Versions tab and
tap the Download button. When it has finished
downloading the Android installer screen will open.
Tap Install to finish.
You must reboot your phone before the module can be
used. Pull down the notification shade and you’ll see a
notification telling you that the module has been installed
but activated. Tap Activate and reboot.

Using Xposed modules

When your device restarts the module will be
activated. You’ll find it in your app drawer alongside all
your normal apps. Launch the app and start testing out
what it does. Many apps require the device to be
rebooted before their settings are applied.

Disable and uninstall Xposed
modules
If you no longer wish to use an Xposed module—or if
you think it might be causing problems to your device in
other ares (such as battery life) and want to temporally
disable it open the Xposed Installer app and tap the
Modules option.

All your installed modules are listed here. To
deactivate one until the box alongside it and then
reboot.

To uninstall an Xposed module long press on the
module in the list and the select Uninstall from the
options. It’s good practice to reboot once more.

Monday, June 22, 2015

Topic: NEW: Any Wifi NetworkAround U with Ogbongeapp.


Hi , most of our fans liue in
areas surrounded with wireless
networks.

MTN 3GB HOTTER .CLICK HERE
And we hv so much mails as
to how to bypass wifi passwords and
penetrate their data.
Today i bring to u an ogbonge
app called wps.wpatester to help do
dis.

Features

+ APPLICATION USAGE ONLY WITH
ROUTER PROPERTY FOR ITS NOT GOING
AGAINST THE LAW.

+ NO ADVERTISING ‘

+ OPTION TO COPY PASSWORD

+ REVOLUTIONISED THE MENU
‘”SHOW
PASSWORD”

Whats New?
+ bugfix
+ added 5 new routers default Pin

Requirement
+ Android 4.0 and up

+ phone must be rooted
+ Busy box must b installed Download
HERE

Adhere strictly to the below
Instructions

1. Make sure ur phone is rooted and
busybox installed Already.

2. Now DOWNLOAD WPS
HACK

3. Now open App and Flex on. “pls dnt
my Wifi”

Note: I hv droped somany free wifi
hack app.
Although Akpati has A snipper tool
(All in one_wifi Tool) + Pdf to help
Hack any wifi around ,if u need it
.then request 4 it here

Sunday, June 21, 2015

Hottest : Glo Is Here Again With Free 1GB Blazing On All Devices…. NO TWEAKING REQUIRED


Get 1GB on ur glo @ #100…

No Tweaking Needed…

Load #150

Go to ur msg, text 1 to 8070

#100 will be remuved and U b granted
1GB For 2weeks…

Works on all devices..

NOTE:
works on all simcards and no tweaking
needed….

Just follow d procedure and u gonna
smile @ last

Curled by DON_PHEZTURZ

Best MTN tariff Plan you should use

We'll be looking at the best of the best tariff
plans that mtn has to offer.

(Best

TruTalk Plus +
Rate: 11 kobo per second (N6.6/min)

Usage: Flat to all networks

Conditions: N5 daily access fee
(Charged only when you make the first
call once a day)

How to Migrate to Mtn Truetalk+

Code to migrate: Dial “*123*20#”

Code to check call balance on MTN: Dial
*556#

2nd Best Tariff Plan:

MTN Zone

Rate: Varies depending on location and
time of call

Lowest rate 4k/s (N2.4/min) and

highest rate 40k/s (N24/min)
Usage: Discount only for MTN to MTN
national calls
How to Migrate to Mtn Zone and Start Making
Cheap Calls

Code to migrate: Dial “*135*1#” or
text “135” to “131”

Code to check call balance on MTN: Dial
*556#
Code to see your active call rate: Dial
*135*3#

Code to view info about your current
zone: Dial *135*2#

Remember to enable cell broadcast on
your phone to display the current rates
on your screen
.

3rd Best Mtn Tariff Plan 2015: MTN iPulse

Rate: 10 kobo per second (N6/min)
after first minute charge at 42k/sec
Usage: Flat to all networks
Conditions: N25 first min (Charged
only when you make the first call once
a day)

How to Migrate to Mtn iPulse and Start enjoying
free data!
Code to migrate: Dial “*406#”
Code to check call balance on MTN: Dial
*556#

Although this looks almost same as the
Super Saver Plus below, the iPulse
carries more VAS such as eligibility for
some data promo

4th Best Mtn Tariff Plan 2015:
SuperSaver Plus

Rate: 10 kobo per second (N6/min)
after first minute charge at 42k/sec

Usage: Flat to all networks

Conditions: N25 first min (Charged
only when you make the first call once
a day)

How to Migrate to Mtn Supersaver Plus Tariff
Plan
Code to migrate: Dial “*408#”
Code to check call balance on MTN: Dial
*556#

Simple Method to Change IMEI of HTC,SAMSUNG,SONY,LG and all other Non MTK devices without PC

Today i will like to tell you about how to change
IMEI of
HTC,SAMSUNG,LG,MOTOROLA,SONY
and other Non-MTK Devices without PC.

if you have been following my blog very well you
will notice that i have wrote a tutorial about how to
change IMEI ON HTC DEVICES VIA
PC well this trick still works but its a little bit
stressful though.

This new method is easy and can be easily done via
your mobile phone no need of pc.

Before i proceed i will like to bring it
to your notice that you are
responsible for whatsoever damage
you cause to your phone Gistpluz
will never be held liable.

REQUIREMENTS

1. Make sure you are rooted,if you are not you
can read the easy rooting steps here

2. Download and Install XPOSED
INSTALLER

3. Download and Install IMEI CHANGER

4. SHARE THIS POST AND
COMMENT

5. USE YOUR HEAD !!!

Now you have all this Apllications installed so we
are ready to proceed.

HOW DO I CHANGE MY IMEI VIA
MOBILE

Open the Xposed Installer and navigate to
FrameWork.

It wiil ask for SuperUser Permission please grant
it let it acquire root permission.

Click on the Install/Update button it will ask for a
reboot, please let it reboot.
After rebooting,open the application again and go to
MODULES

You should see your Installed Modules we are
looking for IMEI CHANGER just like the
picture below,please tick it and reboot.

Now that you have finish rebooting go to the IMEI
CHANGER application in your menu or app list.
Your default IMEI will be written in RED
COLOR with a bold font so big that a blind man
can even see it.

READ- Tutorial On how to root all Tecno PhonesTecno Android
phones

I will advice you to write down the original IMEI
and also make a screenshot of this screen just like
mine and save to your SD CARD.
Now you have to paste your IMEI in the empty
Box and click on APPLY.

You dont need to reboot your phone to apply the new
IMEI just turn on and off the AIRPLANE
MODE and you can see your new IMEI applied.

If this works for you please comment and tell us the
name of the Phone, Thanks and God Bless.

Saturday, June 20, 2015

Simple Trick To Increase Internet Speed on Android phones

slow internet conections
has bugged somany android
userz,especialy if ur phone has low
quality.
Today i brough a simple gud tutorial to
help bypass slow internet on ur
android phones.
Requirements :-

1. Dns Changer App

2. Your Android Device Must Be
Rooted.

Features: –

1) It can be used on any device
whether its samsung or micromax or
LG or Xolo or Any MTK Device.

2) It can be used on any sim like airtel
or mtn or glo or etisalat or vodafone.

3) Increase Internet speed by changing
the dns of your phone.

Adhere strictly to the concise
instructions below

1. Download Dns Changer App HERE

2. Then Install it in your device. Then
Open it and it will ask for root
permissions, click on grant button.

3. Put primary DNS as 8.8.8.8
Put Alternate DNS as 8.8.4.4

4. Now Click on Set Button and feel the
difference.

Method 2.

if u dont wish to use my above tested
method,u ar free to test the below all
in one app called Network Speed
Booster>>> DOWNLOAD IT HERE (2.0mb)

NotE: Drop ur comments and
observations using d below box.

Universal Method For Changing Any Android IMEI to BB IMEI + HTC Androids Special Method

It's bothering me a lot seeing other Android users
complaining that they can’t use the Glo Bis on their
device due to the fact that their device failed to work
with given methods of Changing IMEI.
Today, we are going to discuss how to change HTC
IMEI and any other Android devices.

Disclaimer:
Changing of IMEI is illegal in
some countries, and I will not be held
responsible for any consequences that
befall the changer.

Remember to write down your original
IMEI number and keep it safe. Also,
backup your original IMEI incase
anything goes wrong, then revert using
the above procedures for changing.
How to Change HTC Android
Devices IMEI
First of all, your HTC Android phone must be
rooted. Check >> here<< for the recommended method
of rooting HTC Devices. You may skip that if your
phone is already rooted and continue with the steps
below.

1. Download Android SDK Tools here to your
PC.

2. Go to bootloader by putting off your HTC Phone
then power it on while holding the volume down button
and it will boot to the bootloader, connect your phone
to your PC with your cable and click on Fastboot.
The volume is used to navigate and the power button
is used to select your option.

3. From Fastboot, click on computer and search
"cmd". It will open the command prompt window.
4. Then type "fastboot getvar imei" it will display
your current imei. Type "fastboot oem write imei
35xxxx" the 35xxx stands for the Blackberry imei you
want to use. You will get a success report. Now you
can reboot your phone and enjoy your new IMEI.

For other Android devices, this is a universal method

I&#8217;m about to share with you on how to change your
IMEI to Blackerry, to trick Glo that you are using
a blackberry phone, so that Glo Bis subscription will
work on it.
As we know that the Android phone
manufacturer are many, in that case I can't guarantee
you that is working with all Android devices, but is
perfectly working with most and I pray it support
yours too.

How to Change IMEI of Any Android
Devices

Write the following in your dialler *#7465625# or
*#*#3646633#*#*

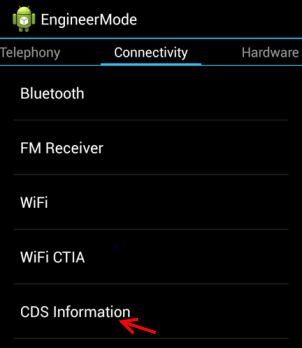
1. Click to Call pad or connectivity options.

2. Find out CDS Information and tap on it.

3. Check out for Radio Information .

4. If your phone has dual SIM space, there will be
two options for you, select the one which you
wished to go with.

5. You can now change the IMEI number following &#8211;
AT +EGMR=1,7,&#8221;IMEI_1&#8221; and &#8220;AT
+EGMR=1,10,&#8221;IMEI_2&#8221; (replace IMEI_1 and
IMEI_2 with your IMEI no)
For example : AT
=EGMR=1,7&#8221;9100XXXXXXXXXXXX

6. And click to send.
If the above method doesn't work on your Samsung
Device, don't force it, we are working tirelessly to
get you the Samsung righteous method. Remember to
generate your own crack Blackberry IMEI with
GIPv4.1 .

Hope this info helps? Feel free to share this post with
your friends using the Share/Like buttons.

Simple Way on to rooting Samsung Galaxy S2 Duos TV GT-S7273T

These are the instructions to root Samsung Galaxy S2
Duos TV GT-S7273T smartphone (running on android
4.2.2) using the KingRoot Application on the mobile itself
(no need of computer).


Requirements : Your smartphone should have atleast
20 percent of device battery or more to begin the root
process.


Root Samsung Galaxy S2 Duos TV GT-
S7273T using KingRoot


Step 1 : On your Android Device, Open Settings >
Security > Device Administration > Unknown Source
(tick to enable it).

Step 2 : Download and install KingRoot APK on
your Android Device.


Step 3 : Once Installation is completed, you will be able
to see the following icon in the Launcher Menu:


Step 4 : Tap on the KingRoot Icon to Open it. Once
KingRoot Application is launched you will be able to see
the following screen:


Step 5 : Now, Tap on the Start Root Button to begin
the root process.


Step 6 : Within a minute or two you will be able to see
the Big Green Tick, which signifies that your device is
rooted successfully.


Step 7 : Restart your Android Device.


Step 8 : Now, as your Samsung Galaxy S2 Duos
TV GT-S7273T smartphone is Rooted Successfully
you might want to verify that your device is rooted or
not. For that,

Download and install Root Checker
Application from the Play Store and verify the root
status manually.

Thursday, June 18, 2015

make a Clockworkmod ( [Tutorial] How to manually create / flash Clockworkmod to an MTK phone

If you're unable to flash Clockworkmod 5 to your
MTK Android phone (e.g Tecno, Gionee, Infinix,
Opsson, Innjoo, Lead1, TLC etc) for whatever reason
then here's a guide on how to manually flash it.

* Note that the procedure is the same for
MTK based Android phones.

Requirement

1. Download MTK droid tools
2. Download PdaNet
3. A PC
4. USB cord
5. A working phone (this is needed to install Mediatek
drivers; its ok whether rooted or not)
6. The phone you wish to flash CWM to (might be the
same phone as that above if its not bricked but needs to
be rooted for this purpose)
7. Make an MTK backup first just in case something
goes wrong (

Procedure

1. Enable USB debugging on a working phone
(Settings > Developer > Tick USB Debugging. If no
Developer under Settings then go to Settings > About
> Keep tapping Build Number till Developer appears
under Settings ) and connect it to the PC

2. With the phone connected, install PdaNet (Select
Other from the list ; you should see "Drivers
Successfully Installed" at the end of installation) .

3. Launch MTK Droid tools

4. MTK Droid tools should display the phone's details
by the left

4a. If it doesn't detect the phone then boot the phone
into factory mode (volume decrease + power button)

5. The box at the bottom should be yellow

6. Click Root at the bottom of MTK and select Yes if
prompted on PC and Grant on phone

7. A green bar should load and the yellow box should
become green

8. Click on the root,backup,recovery tab at the top

9. Click Backup and wait for the backup process to be
complete

10. When prompted to pack backup, select No.

11. When backup is complete, tick 'To select boot.img' (if
you don't have the boot.img file then tick 'To select
Boot from phone' )
11a. Click Recovery and Boot

12. If a Window pops up, select the boot file from the
MTK backup you just made (MTK folder > Backups >
Phone backup)

13. Click Yes to every prompt you get

14. When promoted to boot into recovery mode, click
Yes

15. The phone should now boot into clockworkmod
recovery mode

[Tutorial] How to make an MTK Droid tools backup of an MTK Android phone

Note: This procedure is the same for all
MTK based Android phones (e.g Tecno,
Gionee, Infinix, TLC, Opsson, Innjoo,
Lead1 etc )

# See the video tutorial below or @ http://youtu.be/AJLgSD9zHb8

Tools needed

* A working MTK phone
* Download PdaNet
* Download MTK Droid tools
* PC
* USB Cord

Procedure

* Enable USB debugging on the good MTK phone
(Settings > Developer > Tick USB Debugging) then
connect it to PC. If you don't find Developer under
Settings then go to Settings > About > Keep taping
Build Number

* Install PdaNet on the PC with the USB
debugging enabled working MTK phone still connected
(Select Other from the list of devices during
installation)

* At the end of PdaNet installation, you should get a
"drivers successfully installed" message
* Exit PdaNet in system tray (bottom right corner of
PC)

* Launch MTK droid tools as Administrator (right-
click > run as Administrator) still with the working
MTK phone connected to PC
* MTK droid tools should detect and display the
phones details by the left along with a yellow box at the
bottom

* Click ROOT at the bottom of MTK and select
Yes/OK if prompted on PC and Grant if prompted on
phone

* A progress bar should load at the bottom shortly
after which the yellow box should become green

* Click on the root,backup,recovery tab at the top

* Click Backup (MTK should keep writing some things
by the right hand side during backup) and wait till
backup is complete

* If you get a prompt to pack backup, select No.

* Once backup is complete, don't close MTK droid
tools

* Go to the MTK droid tools folder > Backups >
Folder named after the phone's model e.g
Tecno_m3_backup.... and take note of this folder as the
'Backup folder' because we'll be referring to it soon

* Go back to MTK droid tools and click 'To prepare
blocks for Flash Tool'

* A window will open, in this window, navigate to
the Backup folder (mentioned above) and select the md5
file

* MTK will start copying some items (check the right
hand side) so wait till copying is complete

* If you get an error like "Preparation of files for
FlashTool is impossible, file isn't found" then remove all
scatter files in the backup folder except one and rename
this last one to MT65??_Android_scatter ( where
"??" represents the number for your phone model e.g
MT6572_Android_scatter)

* Once copying is complete, open the Backup folder
and you should see a folder named "!Files to flash"

* The !files to flash folder is a selection of files needed
to use Sp Flash tool, keep it well

* Both the !files to flash folder and the x_backup folder
(which contains the !files to flash folder) are your
phone's MTK backup...

start a BlackBerry smartphone in Safe Mode

Safe mode is designed to allow troubleshooting or
remove any unwanted applications and can also be used
to prevent third-party applications from running
automatically when starting the BlackBerry
smartphone.

To start-up a BlackBerry Storm and BlackBerry
smartphones running BlackBerry Device Software
4.6 to 5.0 in Safe Mode, complete the following steps:

1. Remove and reinsert the BlackBerry smartphone
battery.

2. When the red LED (Light-Emitting Diode) goes
out, press and hold the Escape key (the key just right of
the center trackpad) until the loading screen appears
then release the Escape key.

3. When the BlackBerry smartphone boots up the
Safe Mode disclaimer listed below appears, click OK
to dismiss the disclaimer.

To start-up a BlackBerry Storm 2 and BlackBerry
smartphones running BlackBerry 6 and BlackBerry 7
to 7.1 in Safe Mode complete the following steps:

1. Remove and reinsert the BlackBerry smartphone
battery.

2. Once the loading bar is displayed on the screen of
the BlackBerry smartphone, press and hold the Escape
key (the key just right of the center trackpad) until you
hear beeping or the loading bar completes then release
the Escape key.

3. When the BlackBerry smartphone boots up the
Safe Mode disclaimer listed below appears, click OK
to dismiss the disclaimer.

Safe Mode Disclaimer message:
Your device is currently in Safe Mode. Your device
starts in Safe Mode if you hold the Escape key during
startup. To remain in Safe Mode, click OK. To exit
Safe Mode, click Reset.

NOTE: To turn off Safe Mode, remove and reinsert
the BlackBerry smartphone battery. Safe mode
enabled status is indicated by a safe mode indicator in
the BlackBerry smartphone status section of the Home
Screen.

recover a BlackBerry smartphone from any state


How to to recover a BlackBerry smartphone after all
other possible means of recovery have been exhausted.

* Remove the battery from the BlackBerry
smartphone.

* Open a web browser on a PC (Mozilla Firefox is
recommended ) and navigate to http://hovatek.com/
redirect.php?link=htt...com/update (Ensure to click
'Skip Ad' to proceed)

* Click Check for Updates.

* Wait for the Device Connection dialog box to
appear with no result for pin.
* Connect the BlackBerry smartphone to
the computer
with the battery removed.

* Press Ok when the PIN field is populated with the
BlackBerry smartphones PIN number or PIN-
Unknown is displayed.
Note: Some BlackBerry smartphones may be in a
reset loop, which will cause the field to populate and
depopulate.
This is not an issue; pressing OK when the
PIN field is populated will allow the process to move
forward.

* Select the appropriate version of BlackBerry
Device Software and applications for the BlackBerry
smartphone, click Next.

* At the Review the following options before you
begin dialog, insert the battery without unplugging the
USB cable.

* Press Install update.

fix a Blackberry whose Hotspots keeps getting automatically disconnected


When faced with a Blackberry whose Hotspot keeps
going off on its own, consider this fix:

* Go to Manage Connections and turn on Mobile
Hotspot (WI-FI will automatically come on)

* Go back to Home screen > Options

* Select Networks and Connections

* Select Mobile Hotspot Connections

* Untick 'Don't allow any more devices to connect'

* Tick 'Allow connected devices to exchange data with
each other'

* Set 'Auto shutoff timer' to a higher value or never


VIOLLA YOUR DONE

How to fix the “Application not installed” error onan Android phone


If you’re an app maniac then you should have encountered
the “Application not installed” error while installing apps at
one point or another; but, don’t get me wrong, even people
who hardly install apps could encounter this error too.
This
issue is sometimes accompanied by a mount error in
recovery mode where you get unable to mount Data,
Cache, System, SD card… etc partition errors while
attempting to wipe the Android phone or flash a ROM.

Resolving this issue is easy once you are able to diagnose
and identify the culprit.

Could my phone be infected with a Virus or Malware?
Quite possible. In many cases like this where a virus or
malware is involved, you’ll usually end up with a corrupted
storage partition, and guess what! A corrupted storage
partition is the most common cause of the Application not
installed error.
The possible virus or malware attack is
however not serious enough for you to
format / wipe your
Android phone so don’t delete all your precious files out of
a panic attack.

While installing an app on my Android phone, I get an
error saying I am not allowed to install applications from
unknown sources, what does this mean?
For security reasons, your Android phone is set to only
install applications from the trusted Google Playstore.

You
can however disable this setting by going to Settings >
Security > Ticking “Unknown sources”.
What could cause / result in the “Application not installed”
error?


The most common causes of this error are:

Corrupted phone storage / SD card: This is the most
common cause of this error. If the location where an
application is supposed to be installed has been corrupted,
it only means there’ll be no place to install the app
doesn’t it?

Insufficient storage space: There might not be sufficient
storage space to accommodate the new app
Corrupted app (apk file): The apk file (Android apps
are in .apk format just like Blackberry’s .jad or
Windows’s .exe) might be corrupted or incompletely
downloaded / copied.

Permission error: The Android phone might be going
through a permission crisis.

Temporary OS glitch: The Android OS might have
encountered a minor error.

Apk signed certificate clash: Trying to install another
version of an app (with a different signed certificate) on
the same phone will result in this error.

Installing an unsigned apk: Trying to install an unsigned
apk could result in this error.
Wrong app installation location: Some apps will only be
successfully installed on phone memory while others can
be installed on both phone memory and SD card.
Trying to install the former on SD card could result in
this error.

Installing on a mounted SD card: Trying to install an
app on a mounted SD card will result in this error
because the SD card is inaccessible

Unacceptable apk name: Renaming some apk files prior
to installation has been known to result in this error

How do I fix the Application not installed error on an
Android phone?


Reboot the phone: Rebooting the Android phone could
help clear OS errors that might have occurred.
Check the SD card for errors and fix if required


Format the SD card: In extreme cases, move the
contents on the memory card to a different location then
format it.

Wipe the phone: In extreme cases, wiping the phone
could resolve this issue. You could either do a factory
reset under Settings or data / factory reset in recovery
mode.
Ensure to uninstall unneeded apps to create space.
Uninstall any apps you don’t need.


Double-check the apk file: Check to be sure the apk file
was properly copied / downloaded and is the correct
size.

Reset permissions: Try resetting app permissions
(Settings > Apps > All > Menu key > Reset application
permissions )
Uninstall any previous versions on the same app
currently installed on the Android phone.

Change Installation location: You could toggle application
install location between phone memory, SD card and
automatic.
Ensure that the SD card in not mounted / connected
to a PC
Avoid installing unsigned apks or changing apk file names
prior to installation.

How can i verify that this issue has been successfully
resolved?

Simply by installing an app! You could test if this issue has
been successfully resolved by downloading and installing our
official Android app @

Wednesday, June 17, 2015

Tutorial on How to fix an overheating Blackberry


Its bad enough that your Blackberry doesn’t have a great
battery life, then it has to go overheating on you! In this
brief guide, we’ll be discussing why your Blackberry might
be overheating (and getting drained faster in the process) ,
how to prevent it, and what to do when you find yourself
in such a fix.


What could cause a Blackberry phone to overheat?


Common causes of an overheating Blackberry phone are:

Charging via PC: Constantly charging your
Blackberry using a PC (instead of a wall charger) is
one of the major causes of a swollen / damaged battery

Incompatible charger: The charger might be too
powerful or not powerful enough for the phone

Damaged battery: A damaged battery will not charge /
discharge efficiently, resulting in overheating

Running too many heavy apps at a time: Running too
many apps or too many processor intensive ones at a
time will increase the CPU load, causing the device to
heat up

Battery intensive processes: Battery intensive processes
like high screen brightness, 3G, Wi-Fi, Bluetooth etc
could result in overheating

Heavy usage while charging: Using CPU intensive
processes / heavy gaming while charging is another
possible cause of overheating

Buggy / Rogue application(s): A rogue application
could be consuming system resources selfishly

Hardware bug: The Blackberry’s power unit might be
faulty

Poor network coverage: If in an area with poor
network coverage, the radio will keep searching for
signal and this tells on the battery

Insufficient ventilation: Stuffing the phone in your tight
pocket, handbag or case could cause it to warm up
mildly


How do I know that my Blackberry’s battery is faulty?

Some common symptoms of a damaged battery are:


Phone restarting / going off on its own

Battery not lasting as long as it used to


Phone overheating


How do I fix an overheating Blackberry phone?

When faced with an overheating Blackberry, consider the
following fixes:


Try a different charger: Avoid charging the phone using
a PC, consider using a wall charger specific for the
phone


Battery Replacement: Consider replacing the battery if
it gets full or goes flat too quickly


Exit unused apps: Ensure to close (not minimize) apps
not in use for an extended period


Save power: Ensure to limit the use of animated
screen savers. Also, avoid setting the screen brightness
too high

Disable unused radio: Enable 3G, Wi-Fi and
Bluetooth only when needed

Avoid heavy usage while charging: Avoid running
CPU / battery intensive processes while charging

Remove rogue apps: Closely monitor which applications
cause the phone to lag / throw exception error messages
and uninstall / replace them

Switch to Airplane mode: If in an area with poor /
no reception, switch to airplane mode when signal isn’t
needed

Allow for proper ventilation: Avoid placing the phone in
ill ventilated areas or beside hot objects

Device replacement: The overheating might be due to a
hardware bug / defect. Consider a replacement /
hardware check if the device is still under warranty

How to fix the Android Black Screen of Death

If you’ve ever had your Android phone go unresponsive or
black on you while in use (and still on) then this is one
variant of the Android black screen of death (different from
when the Android phone is bricked and totally dead). In
this very scenario we’ll be discussing, you’ll see lights on the
soft keys (Home, Menu and Back) which indicates that the
phone is still on but the screen will be totally black, no key
or buttons responding.


What could cause the Android Black Screen of Death?


This error usually points at a slow, hanging or lagging
android (see http://www.gistpluz.com/2015/06/how-to-easily-make-android-phone-run.html?m=1 ) so
you might want to consider the following:


Launcher problems: The launcher in use might be
experiencing some problems


Buggy applications: Some apps might be encountering
errors or have used up the phone’s resources


Screen protector / guard: If these interfere with the
phone’s sensors then this could be a problem


How do I fix the Android black screen of death?

If you have such an issue on your hands then try the
following:


Leave the phone for about 30 seconds then try waking it
up with the power button


Remove the battery for 20 seconds then slot back in and
power up the phone

Uninstall any recently installed / suspicious apps

If the phone is running or a third party launcher, revert
to stock launcher or use another

Remove any casing, screen guard or protector

If all of the above don’t work then boot into recovery
mode and do a factory reset


Flash the stock ROM if a factory reset doesn’t help

Tuesday, June 16, 2015

[Tutorial] How to increase RAM in Android mobile phone using SD Card

Once of the worst thing that can ever happen to
Android users is for their device to be crawling like
snail or freezes whenever you open one or more
applications . This kind of problem normally
happens when your Android device is running low on
RAM, therefore you can’t open all the necessary
games and apps because of this.

# Method 1: How to increase ram in Android Mobile
using App
RAM expander gives you an additional
RAM space on your SD card.
I know you will be wondering how an app can
increase the RAM of your android device.
The app canincrease the RAM of Smartphone
with a new technology in which a new file is created
called as SWAP file on the SD card and this file is
used as Virtual RAM to boost the performance of
Android Smartphone . The App that can do this
unthinkable task is

ROEHSOFTRAMEXPANDER.

Let me quickly introduce you to ROEHSOFT
RAM
Expander .ROEHSOFT RAM Expander will
bail you
out of insufficient RAM memory. This appuses part
of your memory card as ram if your SD card is
large.

Why Should I Use
ROEHSOFTRAMEXPANDER?

-It will do the following on yourAndroid device;
-Free SD card memory as a RAM use (SWAP
RAM /
SWAP MEMORY)
- Swapfile RAM expansion up to 4.0 GB (file
system
limit)
- No limit on SWAP partition!
- The usual performance degradation when paged
not occur with sd card fromclass-8
- Widget for PNP swap (swap on / off swap)
- Detailed Memory Information & Analysis
- Autorun
- Swappiness kernel parameter set
- Easy foolproof use (1 click optimization and
automatic calculation)
- Supporting Tung all Android devices (root access
and Kernelswap support)

Before Your Download This App, Check
Compatibility
With YourDevice
But before using the
ROEHSOFTRAMEXPANDER
app, it is very important to first check whether your
device is compatiblewith the ROEHSOFT
RAMEXPANDER app or not. Tocheck
compatibility,
download from Google play MemoryInfo & Swapfile
Check plugin which is free todownload and use. The
main purpose of the software is to checkwhether
your device is compatible with RAMEXPANDER
or
not.; because some someAndroid devices are not in
support inspite of root privileges.

How to easily make an Android phone run faster or stop lagging

A slow, hanging, crashing or lagging Android phone can be
a very frustrating companion to have. There are so many
Android apps that most Android users either fall into the
trap of installing too many or installing buggy apps that could
cause their Android phones to become slow or even get
bricked (like the fonts app). Apps are not the only cause of a
slow Android phone (though they are, in most cases) so we
shall discuss the most common causes of a slow Android
phone and how to make an Android phone run faster.

What could make an Android phone to become slow?
<ul>
Too many heavy applications running at a time: When
too many memory consuming applications are running at
a time then a slow Android phone is imminent

Too many apps installed: An Android phone can
encounter a low internal memory due to too many apps
installed

Too many task managers / RAM boosters / Antivirus:
Many Android users make the mistake of installing
multiple task managers / RAM boosters / Antivirus
which, together, have a negative effect

Low RAM: Running memory intensive apps on an
Android phone with insufficient RAM = Slow Android
phone
Low Internal memory: Saving media and other file
types in the internal memory reduces the available space
for apps and could result in a slow Android phone

Buggy Operating System: Flashing an incompatible
version of Android or a buggy ROM could cause
lagging / slowness

Cluttered or faulty memory / SD card: A faulty
memory / SD card will cause problems for apps which
are installed on it, constantly reading or writing to it

Startup / background processes: Memory intensive
startup / background processes like widgets, live
wallpapers, maps etc could result in a slow Android
phone

Installing Buggy apps: Buggy apps could brick or
significantly slow down an Android phone
Too frequent syncing / background data: Apps like
email, weather, auto backup etc syncing too frequently is
not too good for memory

Slow launcher: In this age of many launchers, the one
you choose could either make or break your Android
user experience

Will rooting make an Android phone run faster?

Rooting, by itself, will not directly make a slow Android
phone run faster ; however, it can give the necessary
privileges to the apps / tweaks which can make a slow
Android run fast again

How do I make a slow Android run faster?

Soft reset: Restart the phone

Hard reset: Remove the battery for 15 seconds, slot it
back in then boot the phone

Overclock: If the kernel supports overclocking, this
could significantly boost an Android phone&#8217;s speed.
Overclocking is the process of tweaking a CPU for
higher performance

Uninstall unneeded apps: Don&#8217;t need it? Uninstall it.

Clear logs: Everything that goes on gets logged and log
files consume memory. Deleting log files is one good
way to free up memory and make a slow Android
phone run faster.

Install apps to SD Card: Setting the default
installation location for apps to SD card will result in
more available internal memory. Simply go to Settings
Storage > Set default write disk to SD Card
thread-170.html )
Uninstall bloatware: Bloatware are those unneeded
apps which come pre-installed on an Android phone but
can&#8217;t be uninstalled like regular apps. Root permission is
needed to uninstall bloatware see ( http://www.gistpluz.com/2015/06/tutorial-on-how-to-root-all-tecno.html

Greenify the phone: Download Greenify to auto-
hibernate unused apps / processes

How do I prevent an Android phone from becoming slow?

Use just one Task manager / RAM booster /
Antivirus at a time

Avoid installing too many apps
Uninstall unneeded or problematic apps
Keeps the phone&#8217;s internal memory as free as possible
Slow down on those widgets and live wallpapers
Flash an optimized Custom ROM

Run regular checks on the SD card to ensure its in
perfect condition

Be careful what apps / ROMs you install / flash,
especially after rooting

Restart your Android from time to time, it helps free
up memory

Wipe cache and log files regularly

How to fix an Android phone that automatically goes off or shuts down frequently

One pretty annoying experience is a mobile phone suddenly
going off on you, especially when you’re working on a
document, article or doing something really important;
something you were careless enough not to have saved.

we’ll be taking a look at this same issue on
Android phones, a commonly ignored ‘suicide note’ to you
from your smartphone.

What could cause an Android phone to automatically go off
or shutdown frequently?


The most common causes of this issue are:

Damaged battery: The battery of the phone might be
swollen or damaged

Overheating: The phone might be overheating due to a
hardware or software issue, causing it to shutdown in
order to cool

.Rogue or incompatible applications: An incompatible
application (usually apps that require root permission ;
see http://www.gistpluz.com/2015/06/tutorial-on-how-to-root-all-tecno.html
could be causing the OS to crash


Incompatible ROM or buggy update: Flashing an
incompatible Stock ROM, Custom ROM or a
buggy / unstable OS update could be another factor


Faulty hardware: The phone might actually have been
sold with a factory defect or have developed a board
issue


Loose battery connectors: The battery might be getting
unseated during movement due to loose battery
connectors

Damaged SD card: The memory card might be
damaged or corrupted

How do I fix an Android phone that automatically goes off
or shuts down frequently?


Terminate unneeded apps / processes: Ensure to close
applications or processes not in use like WI-FI,
Bluetooth, GPS etc so as to reduce the workload on
the processor and battery
Format the memory card or try using another one

Avoid overcharging the battery: A battery should have
charge-discharge cycles, not charge-overcharge cycles.
Overcharging could make the battery wear out quickly

Uninstall buggy apps: If the phone begins to shutdown
suddenly, freeze or becomes slow shortly after installing
certain apps then uninstall them
see https://gistpluz.com/how-to-easily-make-an-android-phone-run-faster-or-stop-lagging


Revert to the previous ROM: If you recently flashed
another ROM or did an Android OS upgrade then
consider reverting to the previous version. In some
cases, re-flashing the Stock ROM or doing an OS
upgrade resolves this issue

Avoid overheating: Poor maintenance practices like
setting the screen brightness too high, placing the phone
near hot objects, using the phone heavily while charging,
charging the phone using a PC and a USB cord
etc should be put in check


Adjust the battery connectors: The battery connectors
transfer charges from the battery to the board and also
help seat the battery firmly in place (you should see them
protruding from the phone once you take off the back
cover and remove the battery). Use a non-corroded
metal to gently push them in place if they appear loose


Replace the battery: Check to see if the battery is
swollen or not charging properly to be sure the battery
is actually the problem. If it is, then consider a battery
replacement


Consider returning the smartphone: If the phone is
brand new and still under warranty then you should
consider taking it in for replacement or repairs before
voiding your warranty by dismantling or rooting the
phone see( http://www.gistpluz.com/2015/06/tutorial-on-how-to-root-all-tecno.html

How to fix an Android phone that doesn’t charge (or discharges) when connected to a power source


It could be really confusing to see the charging sign on your
phone when connected to your charger only for your battery
percentage to remain at the same level for hours or in fact
drop steadily. If you’re a heavy user then you must have
encountered this on one or two occasions


) but that isn’t to say that light users are exempted from this
puzzling phenomenon.
Lets look at it from a less-techy perspective for a moment.
If you connect your charger (which is supposed to increase
battery levels) but the battery levels are dropping instead,
then it must either mean that the phone isn’t being charged at
all or the battery is being consumed faster than its being
charged. Now that we’ve established this, lets proceed.
Why is my Android phone discharging despite being
connected to a power source?

Common causes of this issue are:


Faulty power source: If you’re charging using a PC
(via USB cord) or from a faulty power source then
this is possible


Faulty USB port: A loose, cracked or broken phone
USB port could be a cause
Faulty charger: If the charger is faulty or not powerful
enough then you can expect something like this


Buggy ROM: If you flashed a custom ROM /
Firmware upgrade with power efficiency bugs then you
have another possible culprit


Heavy usage during charging: If you’re running
processor / battery intensive processes during charging
then you have another possible cause


Faulty battery: Some batteries have problems retaining
charge after extensive use


How do I fix an Android phone that doesn’t charge (or
discharges) when connected to power?


Sponsored Links

Some fixes you should consider include:
Ensure the USB jack and USB port are making
firm contact
Try a different charger


Avoid heavy usage during charging
Consider changing the USB port if it looks loose,
cracked or damaged in any way


Try a different power source
.
Flash the stock ROM back to the phone

Consider using an external (like desktop) charger to be
sure the battery is OK

What can I do to prevent future occurrence?

Avoid over-charging your device

Avoid charging your device using a PC

Employ good battery management practices

Do not rotate the USB jack during charging or force
it into the USB port

How to flash a custom recovery (like CWM or TWRP) on Android


<img src="http://i-cdn.phonearena.com/images/article/53914-image/How-to-flash-a-custom-recovery-like-CWM-or-TWRP-on-Android.jpg"

If you have decided to take a trip to the land of custom
ROMs and Android hacking in general, you’d need to take
one first step - flash (install) a custom recovery. In this
article, we explain what exactly is a ‘custom recovery’,
how you install it, and what are some popular solutions.

Let’s start with the fact that every phone ships with stock
recovery software. Stock recoveries vary slightly between
phone makers, but they are identical in their essence - they
allow you to manually flash official updates and clear your
phone’s cache. Sounds limited? It is, and that’s why custom
recoveries exist.

Custom recoveries that we’ll flash here replace the limited
stock ones, adding all sorts of functionality to your phone.
Flashing a custom recovery is often a key part of the
rooting process, but that is not its only use. Here is a short
summary of all that you can do with a custom recovery:

Create and restore a backup image - A backup image
makes a copy of all your phone settings, application and
app data. Such a backup copy is crucial if your hacking
experiments fail - in such cases, you can use the
created backup image to restore your phone to a fully
functional earlier state without losing any data.

Flash custom ROMs - custom ROMs can completely
overhaul the looks and functionality of an Android
smartphone, and usually they are the main reason for
first flashing a custom recovery.

How to flash a custom recovery

Now that you know what a custom recovery is and what
it does, it’s time to go through some popular names of
recovery software. ClockworkMod (shortened to CWM)
and Team Win’s Recovery Project (commonly referred to
as TWRP) are the two most popular solutions, and while
the two differ slightly, they both have the essential features
you need.

PRE-REQUISITES

USB drivers for your phone must be installed on a
computer. You can grab them from the official website
of the company that made the phone. Get the latest:

Samsung Android USB drivers here

HTC Android USB drivers (included in HTC Sync)
here
LG Android USB drivers here (go to “Software
updates” > Select your phone > Click on “Install USB
Drivers”)
Sony Android USB drivers here
Motorola Android USB drivers (included in Motorola
Device Manager) here

Android SDK must be installed on your computer.
You can download from the official Android developer
portal .

Download the latest version of either CWM or
TWRP (we prefer CWM, but both work equally
well). For CWM go to this website, find your device,
and download the image for it:
Download it here

For TWRP go to this website, click on “Get TWRP
for your device” and type you device's name to download
the image for it:
Download TWRP here

Your phone must be connected to your computer via
USB. If you get stuck at some point in the tutorial, a
common fix is to try disconnecting the phone and re-
connecting it again.

How to flash a custom recovery (like
CWM or TWRP) on Android

1. Enable USB debugging on your Android device.
Connect your phone to a computer via USB.


<></img>

2. Now, it’s time to open Command Prompt (terminal) and
get serious
Don’t worry, all you’d need to do is copy and paste some
code in it, it's not hard at all. To open the terminal in
Windows 7, hit the ‘Windows’ key, type ‘cmd’, and hit
Enter;
in Windows 8, you’d need to navigate to the new
Modern UI home panel, and just type in ‘cmd’ there.

Once you open the terminal, you need to change the folder
to Platform Tools in the Android SDK. Typically, it
looks something like this, but you have to find the exact path
where you installed the Android SDK on your computer:

C:/Android SDK/adt-bundle-windows-
x86_64-20131030/sdk/platform-tools/

To change the folder you just copy the above path (as it is
on your computer) and put ‘cd’ in front of it, so the whole
command would look like so:

cd C:/Android SDK/adt-bundle-windows-
x86_64-20131030/sdk/platform-tools/


<img src="http://i-cdn.phonearena.com/images/articles/114969-image/Now-its-time-to-open-Command-Prompt-terminal-and-get-serious.jpg"></img>

3. In the terminal

Enter the following:
adb devices
Make sure your device is listed.
Next, type in:
adb reboot bootloader
Wait for the phone to reboot in bootloader mode.

<img src="http://i-cdn.phonearena.com/images/articles/151305-image/In-the-terminal.jpg"></img>

4. Go to the platform-tools directory
Now, go to the platform-tools directory (a sub-directory
of the Android SDK), and open Command Prompt there
(you can do so by Shift + Right-click > Open Command
Prompt).

In the command line, enter the following:
fastboot devices
Make sure that your device is listed.

Finally, type in:
fastboot flash recovery FILE.IMG
Replace ‘FILE.IMG with the recovery you want to
flash.

We have given you links for CWM and TWRP at
the beginning of the article, but if you've missed them, you
would need to download them now from the following links:

Download CWM here

Download TWRP here
Here’s how that recovery file name typically looks (this is
the image for a Moto G):
cwm-6.0.4.6-MotoG4.4.img
cwm-6.0.4.7-MotoG-GPE-4.4.img
twrp-2.6.3.1-MotoG4.4.img

<img src="http://i-cdn.phonearena.com/images/articles/114968-image/Go-to-the-platform-tools-directory.jpg"></img>

IMPORTANT!
After you have flashed the recovery, it is crucial that you
you don't just reboot your device.

Go to ‘Recovery’ by
using volume down to scroll. Don’t scroll using the Volume
Up button! In this case, Volume Up serves as the ‘Select’
button.

Once you have gone to ‘Recovery’, only then press
the Volume Up to boot in recovery mode.

If you don't follow these instructions, your device will
simply re-flash the stock recovery, and you’d have to start
all over with the custom recovery flash process.

And voila, that’s it! You now have custom recovery flashed
on your phone, congrats!

<img src="http://i-cdn.phonearena.com/images/articles/114967-image/IMPORTANT.jpg"></img>

Note: You can use this how-to tutorial
guide to install custom recovery on phones
like the Samsung Galaxy S5, Galaxy S4,
Galaxy S III, Galaxy Note 3, Galaxy Note 2,
HTC One (M8), LG G3, LG G2, Moto X, Mot